What order to cut plywood in
October 31, 2026 · 7 min read
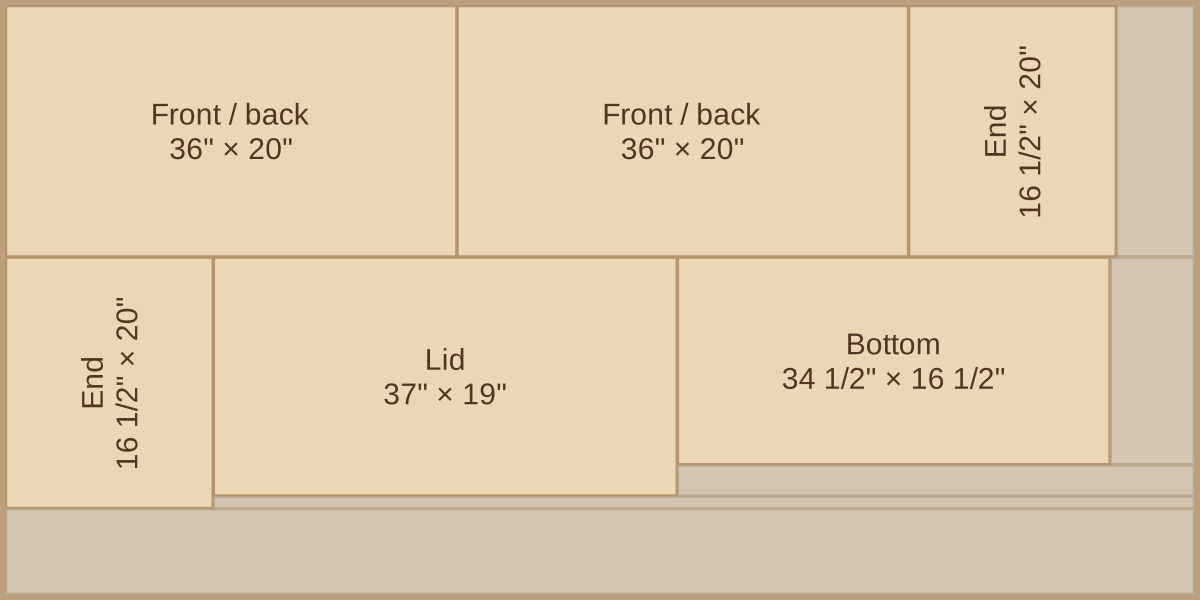
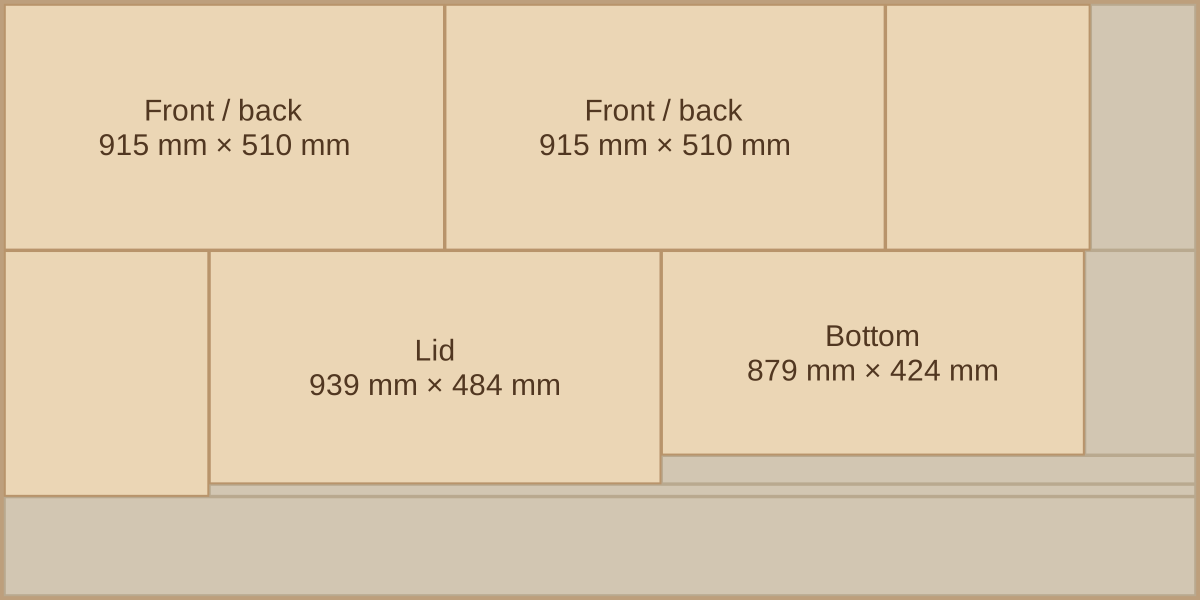
A cutting diagram shows where the parts are. It does not say what to cut first, and a layout that looks fine can be impossible to make: table saws and circular saws cut all the way through, so every cut has to run edge to edge of the piece you are holding.
Break down the full sheet
A full sheet of 3/4"18 mm plywood is heavy and awkward, and pushing one over a table saw alone is how people get hurt. Reduce it to manageable pieces first, on the ground, with a circular or track saw.
- Support the whole sheet. A sheet of rigid foam board on the floor carries both pieces, so nothing drops or pinches the blade at the end of the cut.
- Clamp a straightedge and run the saw's base plate along it. Measure the offset from the blade to the edge of the plate on your saw once, and mark it on a scrap you keep with the saw.
- Set the blade to just clear the sheet. Less blade in the cut means a cleaner edge and less to go wrong if the saw binds.
- Cut oversize here. Leave about 1/2"10 mm on the pieces you will take to final size at the table saw.
- Wear eye and hearing protection, and keep the cord clear of the line.
Which face goes up
Tear-out shows up where the teeth exit the wood. That differs by saw, so the good face changes side:
| Saw | Teeth exit | Good face |
|---|---|---|
| Circular saw | Top of the sheet | Down |
| Table saw | Bottom of the sheet | Up |
| Track saw with splinter guard | Top, but backed by the guard | Up, if your guard is in good shape |
For a cleaner edge across the grain, where tear-out is worst, score the line with a knife or use masking tape and a fine-tooth blade. Tape is worth testing on a scrap with your veneer.
Rules for the order
- Whole-sheet cuts first. Each cut divides a piece into two smaller pieces, so start with the cuts that run from edge to edge of the entire sheet.
- Long cuts before short ones within a piece. Separate the big blocks of the layout and then work inside each one.
- Keep a reference edge. Trim a damaged factory edge first, then cut everything from that clean edge.
- Group equal settings. If two parts share a width, cut them back to back without moving the fence, so they end up truly identical.
- Cut the largest safe piece first. It is easier to handle a large strip now than to wrestle one out of a narrow offcut later.
A worked sequence
Here is a 6-piece toy chest from one 4×8 ft (96 × 48")2500 × 1250 mm sheet, with a 1/8"3 mm kerf and 1/2"10 mm trim. Numbers on the diagram match the table.
| # | Cut | Fence | Piece on the saw | Gives |
|---|---|---|---|---|
| 1 | Rip | 20" | 95" × 47" | to cut further |
| 2 | Rip | 20" | 95" × 26 7/8" | to cut further |
| 3 | Crosscut | 36" | 95" × 20" | Front / back |
| 4 | Crosscut | 36" | 58 7/8" × 20" | Front / back |
| 5 | Crosscut | 16 1/2" | 22 3/4" × 20" | End |
| 6 | Crosscut | 16 1/2" | 95" × 20" | End |
| 7 | Rip | 19" | 78 3/8" × 20" | to cut further |
| 8 | Crosscut | 37" | 78 3/8" × 19" | Lid |
| 9 | Rip | 16 1/2" | 41 1/4" × 19" | to cut further |
| 10 | Crosscut | 34 1/2" | 41 1/4" × 16 1/2" | Bottom |
| # | Cut | Fence | Piece on the saw | Gives |
|---|---|---|---|---|
| 1 | Rip | 510 mm | 2480 mm × 1230 mm | to cut further |
| 2 | Rip | 510 mm | 2480 mm × 717 mm | to cut further |
| 3 | Crosscut | 915 mm | 2480 mm × 510 mm | Front / back |
| 4 | Crosscut | 915 mm | 1562 mm × 510 mm | Front / back |
| 5 | Crosscut | 424 mm | 644 mm × 510 mm | End |
| 6 | Crosscut | 424 mm | 2480 mm × 510 mm | End |
| 7 | Rip | 484 mm | 2053 mm × 510 mm | to cut further |
| 8 | Crosscut | 939 mm | 2053 mm × 484 mm | Lid |
| 9 | Rip | 424 mm | 1111 mm × 484 mm | to cut further |
| 10 | Crosscut | 879 mm | 1111 mm × 424 mm | Bottom |
The "fence" column is the distance from the reference edge to the blade for the piece on the saw. "To cut further" means the piece comes back to the saw later in the sequence.
Fewer fence settings
Every time you move the fence you add a chance for a slightly different measurement. A layout that packs tightly can ask for more settings than one laid out in strips, without using any more sheets. For the sides of eight drawer boxes, both plans below use 1 sheet:
Tightest packing: 36 cuts, 8 settings
Laid out in strips: 36 cuts, 5 settings
Tightest packing: 51 cuts, 12 settings
Laid out in strips: 41 cuts, 5 settings
When sheets are not the limiting factor, the plan with fewer settings is usually the better one. It is quicker, and repeated parts come out the same.
Every layout and sheet count in this guide was calculated by the optimizer inside Plyplan.