One-sheet plywood bookcase: full cut list and cutting plan
October 31, 2026 · 5 min read
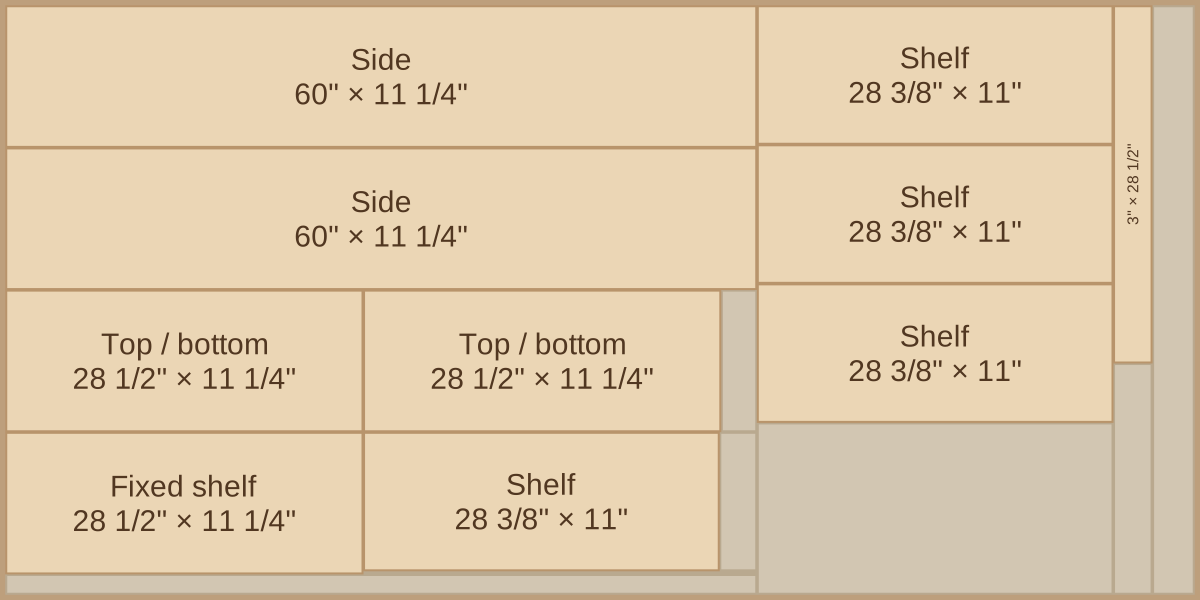
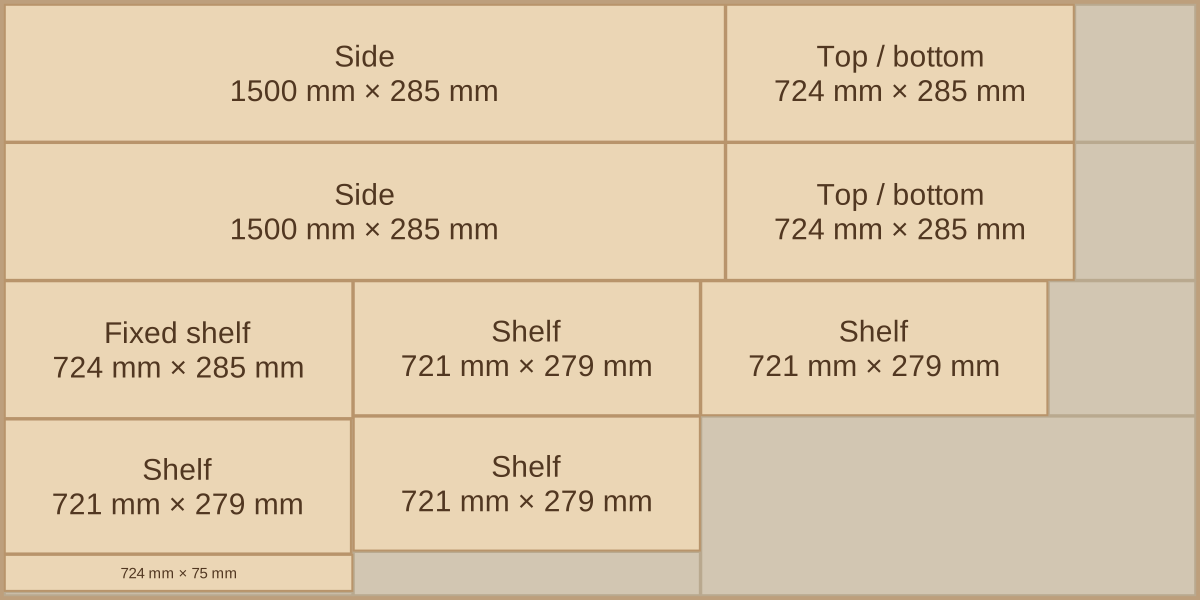
A 60"1500 mm bookcase with a fixed center shelf and four adjustable ones, with the whole carcass coming out of a single 4×82500 × 1250 mm sheet. Here is every part, every cut and every fence setting.
The bookcase
- Size: 60" tall, 30" wide, 11 1/4" deep1500 mm tall, 760 mm wide, 285 mm deep.
- Materials: one sheet of 3/4"18 mm plywood for the carcass, and a 1/4"6 mm panel of at least 59 1/4" × 29 1/4"1482 mm × 742 mm for the back.
- Saw setup: 1/8"3 mm kerf and 1/2"10 mm edge trim.
- Waste: 2125% of the 3/4"18 mm sheet.
Cut list
| # | Part | Qty | Length | Width | Grain |
|---|---|---|---|---|---|
| 1 | Side | 2 | 60" | 11 1/4" | along length |
| 2 | Top / bottom | 2 | 28 1/2" | 11 1/4" | free |
| 3 | Fixed shelf | 1 | 28 1/2" | 11 1/4" | free |
| 4 | Shelf | 4 | 28 3/8" | 11" | along length |
| 5 | Toe kick | 1 | 28 1/2" | 3" | free |
| 6 | Back | 1 | 59 1/4" | 29 1/4" | free |
| # | Part | Qty | Length | Width | Grain |
|---|---|---|---|---|---|
| 1 | Side | 2 | 1500 mm | 285 mm | along length |
| 2 | Top / bottom | 2 | 724 mm | 285 mm | free |
| 3 | Fixed shelf | 1 | 724 mm | 285 mm | free |
| 4 | Shelf | 4 | 721 mm | 279 mm | along length |
| 5 | Toe kick | 1 | 724 mm | 75 mm | free |
| 6 | Back | 1 | 1482 mm | 742 mm | free |
Cutting plan
The sides and adjustable shelves keep their grain along the length. The top, bottom, fixed shelf and toe kick can turn, which is what makes the layout fit. Rough cut any large pieces before you bring them to a table saw. Here's how to break down a sheet safely.
Cut sequence
| # | Cut | Fence | Piece on the saw | Gives |
|---|---|---|---|---|
| 1 | Crosscut | 60" | 95" × 47" | to cut further |
| 2 | Crosscut | 28 3/8" | 34 7/8" × 47" | to cut further |
| 3 | Crosscut | 3" | 6 3/8" × 47" | to cut further |
| 4 | Rip | 28 1/2" | 3" × 47" | Toe kick |
| 5 | Rip | 11 1/4" | 60" × 47" | Side |
| 6 | Rip | 11 1/4" | 60" × 35 5/8" | Side |
| 7 | Rip | 11 1/4" | 60" × 24 1/4" | to cut further |
| 8 | Rip | 11 1/4" | 60" × 12 7/8" | to cut further |
| 9 | Rip | 11" | 28 3/8" × 47" | Shelf |
| 10 | Rip | 11" | 28 3/8" × 35 7/8" | Shelf |
| 11 | Rip | 11" | 28 3/8" × 24 3/4" | Shelf |
| 12 | Crosscut | 28 1/2" | 60" × 11 1/4" | Top / bottom |
| 13 | Crosscut | 28 1/2" | 31 3/8" × 11 1/4" | Top / bottom |
| 14 | Crosscut | 28 1/2" | 60" × 11 1/4" | Fixed shelf |
| 15 | Rip | 11" | 31 3/8" × 11 1/4" | to cut further |
| 16 | Crosscut | 28 3/8" | 31 3/8" × 11" | Shelf |
| # | Cut | Fence | Piece on the saw | Gives |
|---|---|---|---|---|
| 1 | Rip | 285 mm | 2480 mm × 1230 mm | to cut further |
| 2 | Rip | 285 mm | 2480 mm × 942 mm | to cut further |
| 3 | Crosscut | 1500 mm | 2480 mm × 285 mm | Side |
| 4 | Crosscut | 1500 mm | 2480 mm × 285 mm | Side |
| 5 | Crosscut | 724 mm | 977 mm × 285 mm | Top / bottom |
| 6 | Crosscut | 724 mm | 977 mm × 285 mm | Top / bottom |
| 7 | Crosscut | 724 mm | 2480 mm × 654 mm | to cut further |
| 8 | Crosscut | 721 mm | 1753 mm × 654 mm | to cut further |
| 9 | Rip | 285 mm | 724 mm × 654 mm | Fixed shelf |
| 10 | Rip | 279 mm | 724 mm × 366 mm | to cut further |
| 11 | Rip | 279 mm | 721 mm × 654 mm | Shelf |
| 12 | Rip | 279 mm | 721 mm × 372 mm | Shelf |
| 13 | Rip | 279 mm | 1029 mm × 654 mm | to cut further |
| 14 | Rip | 75 mm | 724 mm × 84 mm | Toe kick |
| 15 | Crosscut | 721 mm | 724 mm × 279 mm | Shelf |
| 16 | Crosscut | 721 mm | 1029 mm × 279 mm | Shelf |
The fence column is the distance to set from the edge against the guide. Do not make long crosscuts against a table saw fence: use a sled, or a straightedge and a circular saw, and treat the number as your guide setting.
Assembly notes
- Mark the shelf-pin holes in both sides before assembly, using one template so they line up.
- Cut the rabbets for the back: 3/8" wide and 1/4" deep9 mm wide and 6 mm deep along the rear edge of the sides, top, bottom and fixed shelf. Check the depth against your real back panel.
- Dry-fit the case and confirm the top, bottom and fixed shelf are exactly the same length.
- Glue and fasten the top, bottom and fixed shelf between the sides, keeping the bottom 3"75 mm up to leave room for the toe kick. Add the toe kick flush with the front.
- Check for square by comparing the diagonals, then fit the back. The back is what holds the case square.
- Finish the edges with iron-on banding or solid-wood strips if you do not want to see the plies, and do it before you fit the adjustable shelves. A heavy band adds thickness at the ends of the shelves too.
Want a different size? Open this cut list in the calculatorOpen this cut list in the calculator and change the parts. Keep an eye on the sheet count: at this width, a 72" version no longer fits on one sheet.a much taller or wider version may no longer fit on one sheet.
Every layout and sheet count in this guide was calculated by the optimizer inside Plyplan.